
Appearance
Creating Bills
Learn how to convert tracked time into professional invoices that you can send to clients.
🎥 Video Tutorials
Watch These Videos
- 🎥 Billing: Cherry pick user hours - Select specific hours to bill
- 🎥 Billing: Specify hours to add - Manually enter hours
- 🎥 Download Bill contents as CSV - Export billing data
Watch how to create bills when you don't yet have tracked work to invoice - perfect for retainers, fixed fees, and advance billing.
Before You Start
Before creating a bill, you need to ensure a few prerequisites are in place:
Required for all bills:
- Client - The client must exist in your Hidma system with their contact and billing details properly configured
- Project - At least one project must be created for the client. You cannot create a bill without an associated project
For time-based billing (billing tracked hours):
- Approved Time Entries - Time entries must be logged to the project and approved by a manager through the timesheet approval workflow (unapproved time can't be billed)
- Charge-out Rates - Rates must be set up for the users or roles working on the project, as these rates determine how much you'll bill per hour of work
For non-time-based billing (retainers, fixed fees, deposits):
- You don't need any tracked hours
- You can create bills with manual charges, fixed amounts, or recurring fees even when no work has been performed yet
- This is common for advance billing, monthly retainers, setup fees, or fixed-price project milestones
Step-by-Step Guide
Step 1: Navigate to Bills
- Click Bills in the left sidebar
- You'll see the Billing page, now organised into four dedicated tabs: Ready for Billing, Bills, Receipts, and Credit Notes (see the Billing Page at a Glance)
- Open the Ready for Billing tab to find projects with unbilled work, or the Bills tab to see existing bills
Step 2: Start a New Bill
Click the + Add New button in the top right of the Billing page. From the dropdown you can pick:
- Bill - A one-off bill (what this guide covers)
- Recurring Bill - A recurring bill setup that Hidma generates on a schedule
- Copy a Bill - Start from an existing bill as the basis for a new one
Step 3: Select Client and Project
- Choose the client from the dropdown list
- Select the project you're billing for
- If the client has multiple projects, you'll see them as tabs
- Choose the one you want to include on this bill
Step 4: Set the Date Range
Choose which dates to include:
- Select a start date and end date
- The system will show all approved, unbilled hours in this range
- Common ranges: weekly, bi-weekly, monthly
Tip
Only unbilled hours will show. If you don't see hours you expect, they may already be on another bill or haven't been approved yet.
Step 5: Add Hours to the Bill
Hidma gives you three flexible ways to add hours to your bill, each suited to different billing scenarios.
Add All Hours is the straightforward approach for standard time and materials billing. When you click "Add All," Hidma pulls in every approved, unbilled hour from all team members who worked during your selected date range. The system automatically applies each person's charge-out rate and generates line items showing who worked, what they did, and what it costs. This approach works perfectly when you're billing everything you've done for a client and there's no need to be selective about what gets invoiced.
Cherry Pick Hours gives you granular control when you need to be selective about billing. Perhaps your client has a budget cap and you can only invoice up to a certain amount. Maybe some team members' time shouldn't be billed yet, or certain types of work need to be excluded from this particular invoice. The cherry pick interface lets you select specific hours from specific people, choosing exactly what appears on the bill while leaving other hours available for future billing. This selective approach ensures you stay within agreed parameters while maintaining accurate records of all work performed. Learn more about cherry picking
Specify Hours is designed for fixed-fee or capped billing arrangements where the invoice amount doesn't necessarily match the actual hours tracked. You manually enter the number of hours to bill - which might be fewer than actually worked if you're honoring a fixed price agreement, or could be a round number that represents an agreed-upon amount. This approach is common for fixed-price projects where you've agreed to deliver specific work for a set fee regardless of how long it takes, or for retainer arrangements where the client pays a consistent amount each period. The time you've tracked remains in the system for your internal project management and profitability analysis, but the bill shows the contracted amount. Learn more about specifying hours
Per-Bill Time Entry Options
You can change how time is added to this specific bill without touching your organisation-wide billing settings. Click the More Options button (the three-dots icon ⋮) above the unbilled jobs table and choose your preferred behaviour for this bill only:
- Show all unbilled work - Include every unbilled item, ignoring the default organisation assigned to jobs
- Show non-billable work - Reveal non-billable hours in the table for reference (they still won't be invoiced)
- Break down jobs based on individual time entries - Add each job as its own set of individual time entries when it's pulled onto the bill, rather than as a single consolidated job line
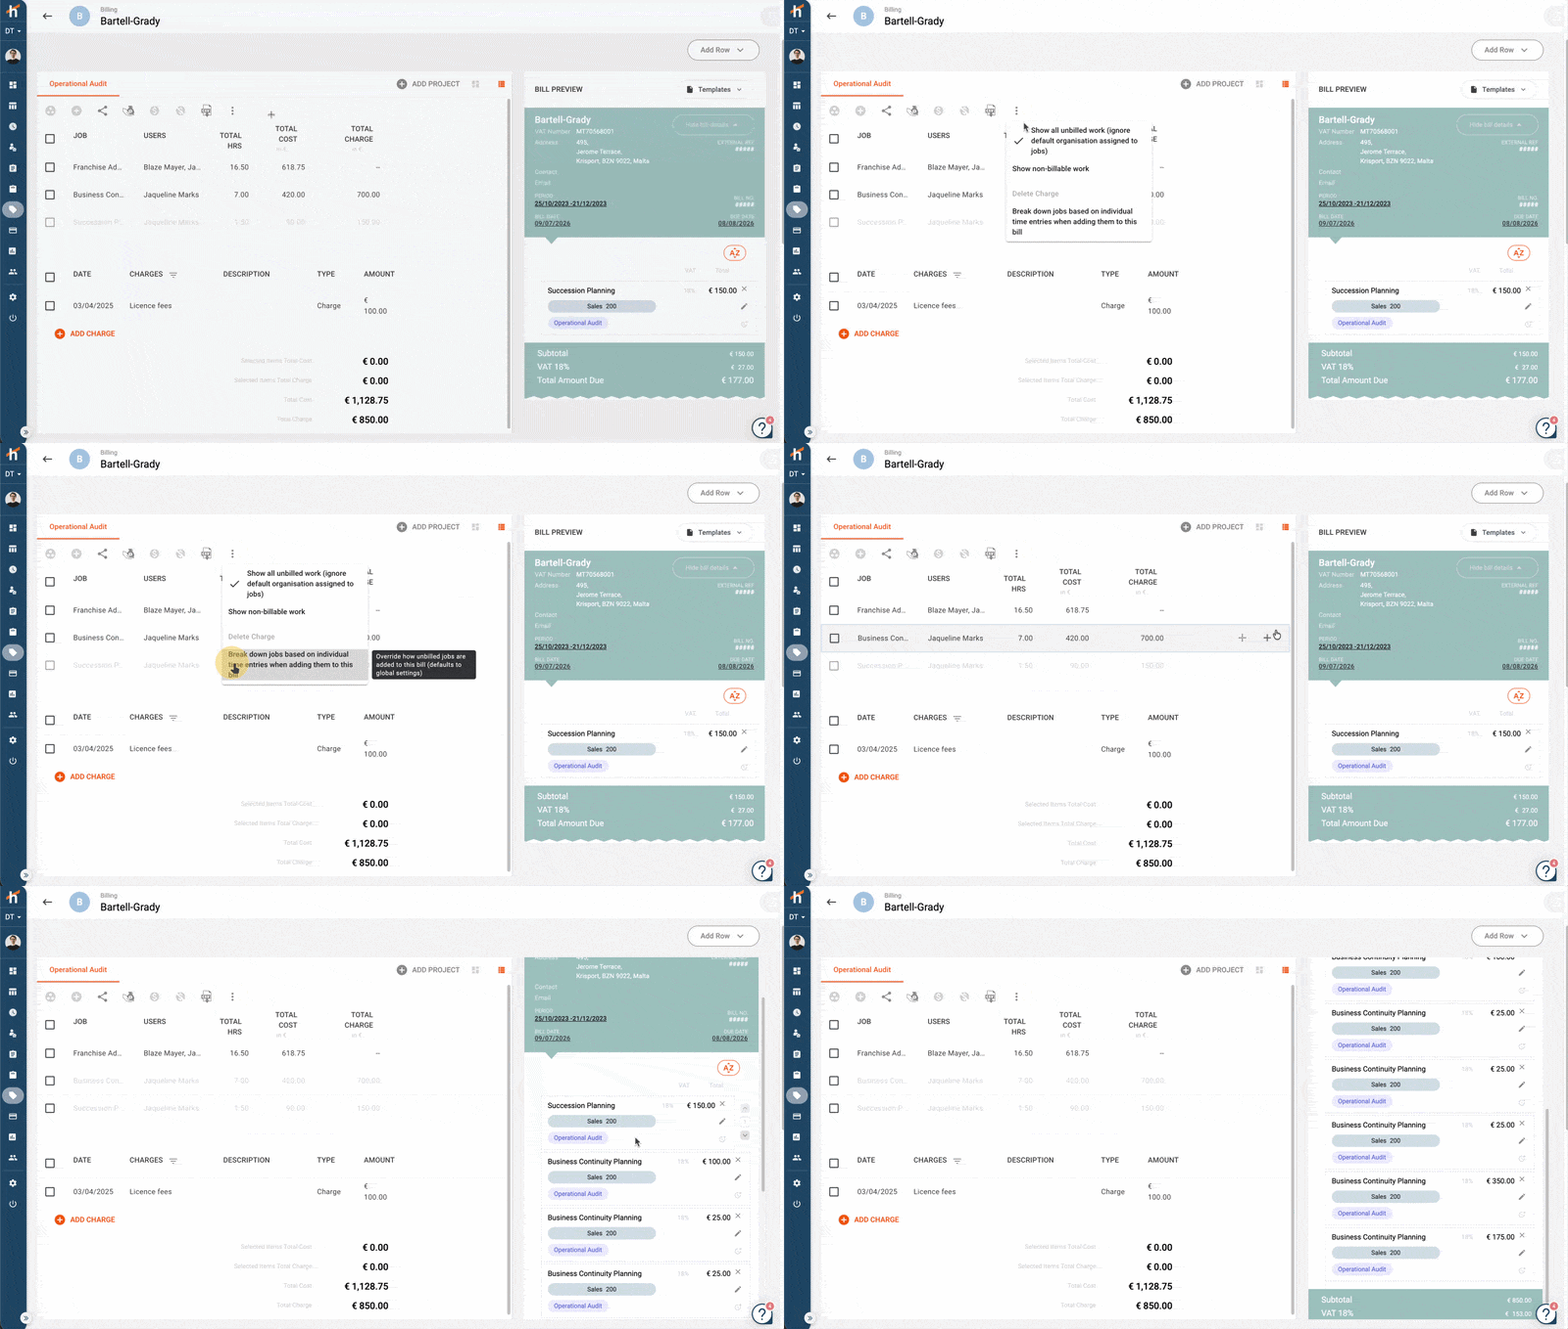
Each of these overrides the global default for this bill only - your organisation-wide billing configuration is unaffected, so you can tailor a one-off bill without changing everyone else's defaults.
Closing Off Projects from the Bill Page
Raising the final bill on an engagement and closing the project are almost always the same moment - so you no longer have to leave the billing screen to do the second half.
While viewing or editing a bill, open the More Options menu (⋮) and choose Close off projects related to this bill. This closes every in-scope project attached to the bill, without navigating away.
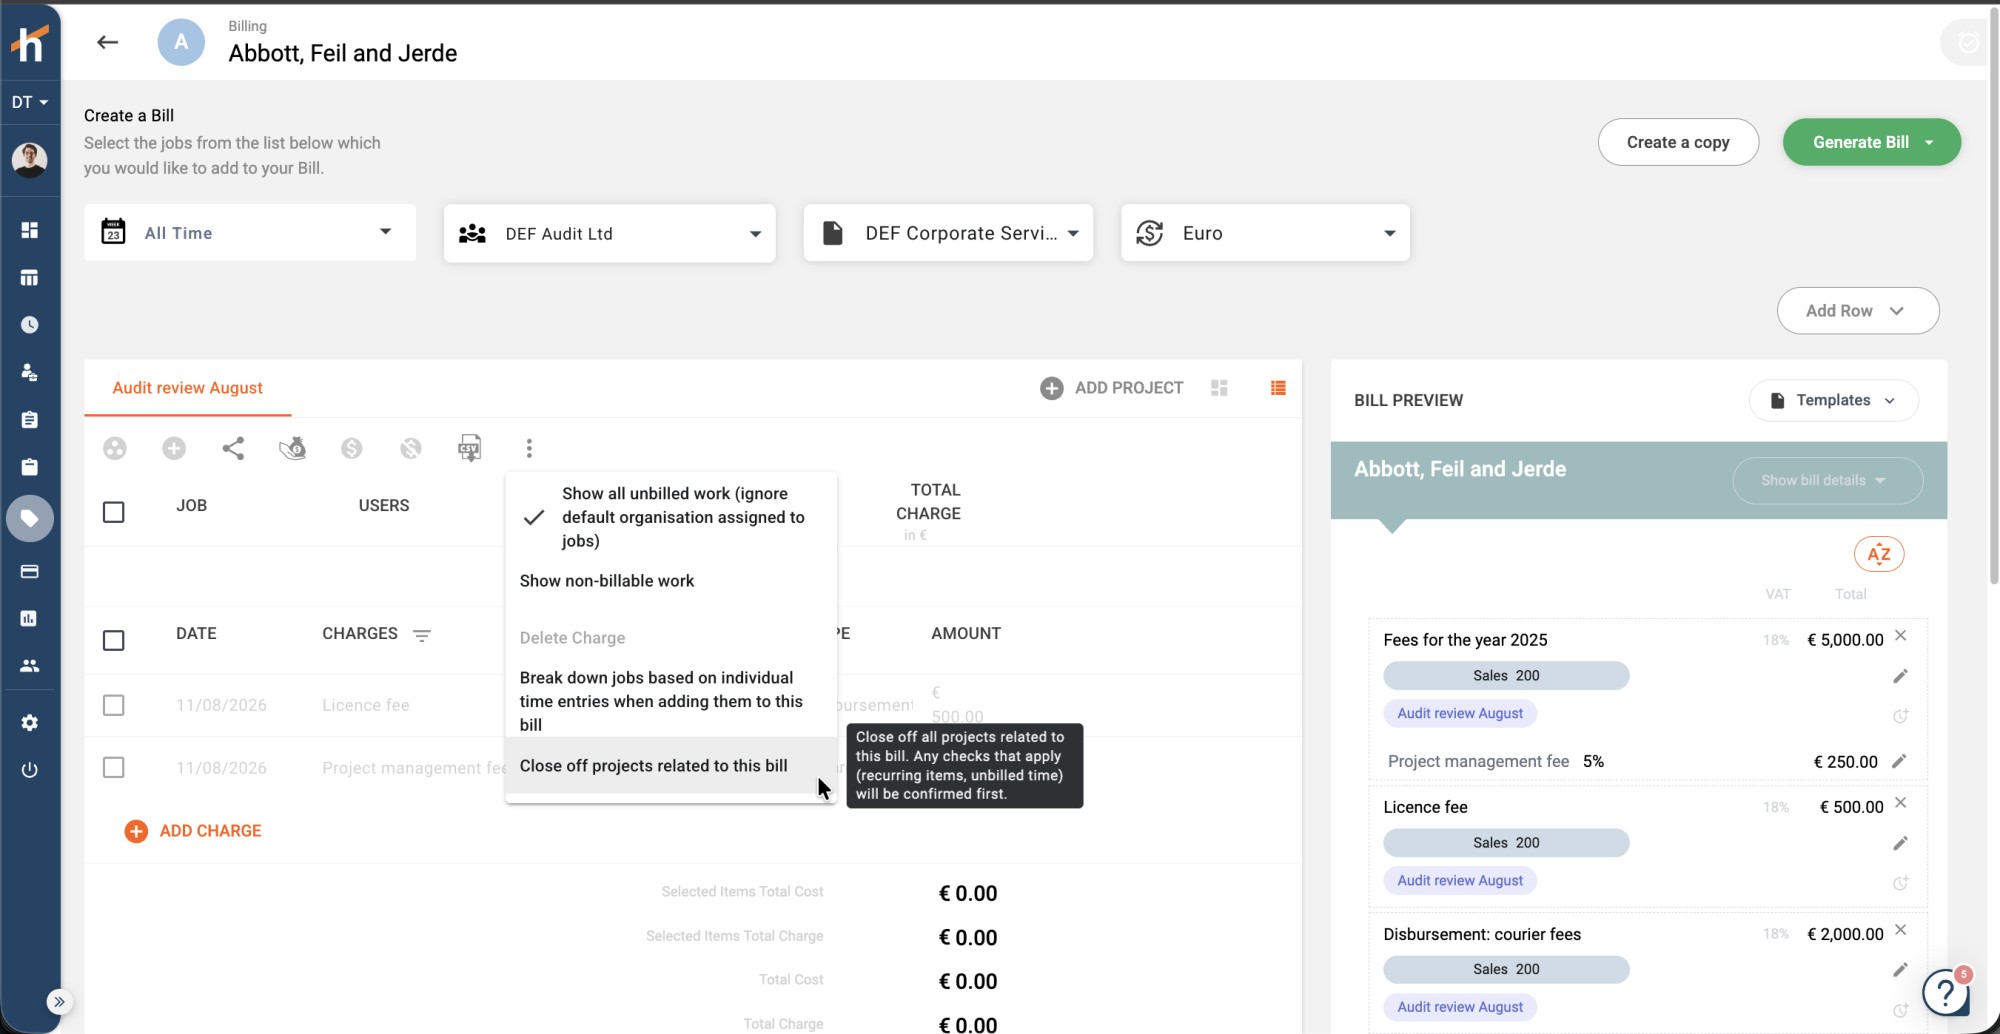
The menu item's tooltip states what happens: "Close off all projects related to this bill. Any checks that apply (recurring items, unbilled time) will be confirmed first."
The usual closing checks still run
This is a shortcut to the action, not a bypass of its safeguards. Hidma still runs the normal project-closing checks first - outstanding recurring items and unbilled time are surfaced for confirmation before anything closes, exactly as they would be from the project itself. See Closing Projects for what those checks cover.
Step 6: Review the Bill Preview
As you build your bill, the right side of the screen displays a live preview showing exactly what your client will see when they receive the invoice. This preview is your opportunity to catch any errors before the bill goes out.
Optimized Preview Pane
The bill header (client details, dates, etc.) is now collapsed by default to give you more screen real estate when working with bill rows. Click the Show Bill Details button to expand and view the full header when needed.
The preview starts with the client's name and billing address at the top, followed by an automatically generated invoice number and the invoice date. Below that, you'll see all the line items you've added, each showing a description that typically includes the project name, job type, team member who performed the work, and number of hours worked. Next to each line item is the hourly rate being applied and the calculated amount (hours multiplied by rate). At the bottom, the preview displays the subtotal (sum of all line items), any applicable tax or VAT based on your configured tax rate, and finally the total amount due - the number the client will be expected to pay. This real-time preview updates instantly as you add or modify line items, giving you immediate feedback on how changes affect the final invoice.
Step 7: Add Additional Charges (Optional)
Most bills contain more than just time-based line items. The "Add Charge" functionality lets you include any additional fees, expenses, or adjustments that should appear on the invoice.
Click "Add Charge" to include items like fixed fees (for example, a monthly project management fee that's charged regardless of hours), reimbursable expenses (such as travel costs, accommodation, or materials purchased on the client's behalf), one-time charges for specific deliverables, or equipment and material costs that aren't captured through time tracking. Each charge you add becomes its own line item on the invoice with its own description and amount.
Beyond adding charges, you can also apply adjustments to the entire bill. Discounts can be added as either a percentage off the total or a fixed dollar amount reduction - useful when you've agreed to reduce the fee or want to provide a goodwill discount. Similarly, you can add surcharges as percentage-based or fixed amount additions for things like rush fees or after-hours work premiums. These adjustments appear as separate line items on the invoice, maintaining transparency about what the client is being charged and why. Learn about discounts and charges
Step 8: Customize Line Items (Optional)
Once your line items are loaded, you can refine how they appear on the invoice to make it clearer and more professional.
Grouping similar items helps create cleaner, more digestible invoices. If you have multiple line items that are related - perhaps several people worked on the same deliverable, or you have numerous small entries for the same type of work - you can combine them into a single consolidated row on the invoice. The hours and amounts still add up correctly, but instead of showing ten separate line items, your client sees one clear line that says "Financial Analysis - 45 hours." This consolidation makes invoices much easier for clients to review and approve, particularly for larger projects with many contributors. Learn about grouping items
Editing descriptions lets you add clarity and context to each line item. Click on any description field to modify it - you might want to change generic job names to specific deliverable descriptions, add details about what was accomplished during those hours, or adjust the language to match terminology your client uses. Clear, specific descriptions like "Q4 Financial Statement Preparation" or "Tax Research for Asset Restructuring" help clients immediately understand what they're paying for, which speeds approval and payment. Keep your descriptions professional and focused on value delivered rather than just activities performed.
Step 9: Save the Bill
When everything looks correct:
- Review the total amount
- Check all line items and descriptions
- Click "Save" or "Generate Bill"
The bill is now saved with status "Pending Invoice".
Unapproved Work Warnings
When creating a bill Hidma will warn you if the project has unapproved time entries. This is to stop you invoicing work that nobody has signed off on yet. The warning includes a quick summary so you can:
- See exactly which entries are still pending approval
- Open the list directly from the warning to chase the approver
- Decide whether to proceed with the bill (excluding the unapproved hours) or wait for approval first
Unapproved hours never appear on the bill in any case - they are held back until they move through the approval workflow - but the warning means you won't generate the bill unaware that more work is still coming.
What Happens Next?
After saving your bill, it enters "Pending Invoice" status and several options become available.
While the bill remains in pending status, you retain full editing capability. You can review the bill again with fresh eyes, make any changes you realize are needed, add line items you initially forgot, adjust amounts if you discover errors, or modify descriptions for clarity. This pending period is your safety net before the invoice becomes official and goes to the client.
When you're confident the bill is correct, you can send it to the client through several methods. Export the bill as a PDF file that you can attach to an email or store in your document management system. Email it directly from Hidma if your system is configured with email integration, which automatically generates and sends a professional invoice email to the client's billing contact. Or print a physical copy if your client prefers mailed invoices or you need a hard copy for your files.
Sending Bills to Xero
If your organisation has the XERO integration connected, the "Generate Bill" button provides additional options to send your invoice directly to Xero:
- Generate in Hidma only - Creates the bill in Hidma without sending to Xero
- Generate in Hidma & Xero - Creates the bill and sends it to Xero as an unauthorised invoice, pending approval in Xero
- Generate in Hidma & Xero (Approved) - Creates the bill and sends it to Xero as an authorized invoice, ready to be sent to the client
Once generated with Xero, you'll see a "View Bill in Xero" button that opens the invoice directly in your Xero account. The bill preview also shows the mapped Xero account codes (Revenue Account and Tax rate) that will be applied.
TIP
To copy an invoice to Xero, simply click the "Generate Bill" dropdown and select one of the Xero options. No manual export or re-entry is needed — the invoice appears in Xero automatically with all line items, tax codes, and amounts intact. Learn more about the XERO integration
Smarter Xero Validation
If you attempt to generate a bill in Xero with unmapped items, Hidma provides clear, actionable feedback. You'll be prompted if the Client, Tax Rate, or Document Template need to be connected to Xero before the bill can be pushed.
For example, if a client isn't yet connected to a Xero contact, Hidma will prompt you to either search for an existing contact in Xero with the same name, or create a new contact and map it automatically. The same applies for unmapped tax rates and templates.
Watch how smarter validation helps you fix Xero sync errors directly from the bill creation screen.
Once the bill is sent, Hidma helps you track its complete lifecycle. Mark the bill as sent to change its status and start aging calculations for accounts receivable reporting. Record payments as they come in - whether full payment, partial payment, or payment against multiple outstanding invoices. The system continuously monitors outstanding amounts, calculates aging, and provides visibility into which clients have paid, which have outstanding balances, and which invoices are approaching or past their due dates.
Bill Due Dates
Hidma supports automated due dates on all your bills. Due dates help you track payment timelines and are automatically calculated based on your configured payment terms.
Setting Default Payment Terms
- Go to Settings → Configuration → Billing Settings
- Define your default payment terms (number of days from invoice date)
- All new bills will automatically calculate a due date based on these terms
Due Dates on Templates
Due dates are enabled by default on all document templates. To toggle them on or off for specific templates:
- Go to Settings → Customisations → Document Templates
- Edit the relevant template
- Enable or disable the due date field
- Save the template
Xero Integration
Bill due dates are automatically included when copying bills to Xero, ensuring payment terms stay synchronized across both systems.
Understanding Bill Status
- Pending Invoice - Draft, can still be edited
- Invoiced - Sent to client, awaiting payment
- Partially Paid - Some payment received
- Paid - Fully paid
- Overdue - Past due date without full payment
- Cancelled - Voided/cancelled
Common Billing Approaches
Approach 1: Bill Everything
When to use: Standard hourly billing, client wants full detail
- Choose date range (e.g., past month)
- Click "Add All"
- Review and save
- Send to client
Approach 2: Selective Billing
When to use: Client has budget limits, need to be selective
- Choose date range
- Click "Cherry Pick Hours"
- Select specific team members and hours
- Review total against budget
- Save and send
Approach 3: Fixed Amount
When to use: Fixed-price projects, retainer billing
- Choose date range (for internal tracking)
- Click "Specify Hours"
- Enter agreed amount as hours (or add as fixed charge)
- Save and send
Creating Bills Without Tracked Work
Sometimes you need to create an invoice before any work has been performed or tracked in timesheets. This is common for several billing scenarios and Hidma fully supports manual bill creation without requiring time entries.
When to Bill Without Tracked Hours
Retainer Agreements Many professional services firms work on retainer arrangements where clients pay a fixed monthly fee regardless of hours worked. You might track time internally for project management purposes, but the invoice amount is predetermined. Create a bill with the retainer amount even when the billing period hasn't started yet.
Fixed-Price Projects - Milestone Billing When you've agreed to deliver specific work for a set price, you often bill at project milestones (start, midpoint, completion) rather than based on hours. Invoice at the beginning of a project or when reaching a milestone, even if most of the work hasn't been done yet.
Advance Payments and Deposits Clients may require an upfront invoice for advance payment or deposit before work begins. This protects both parties - you receive funds to begin work, and the client locks in your availability.
Setup Fees and Onboarding Charges Initial engagement fees, system setup charges, or onboarding costs are often invoiced separately before regular project work starts.
Fixed Charges and Recurring Fees License fees, subscription charges, monthly platform fees, or other recurring charges that aren't related to time tracking.
How to Create Manual Bills
Method 1: Add Fixed Charges
- Navigate to Bills > Create Bill
- Select the client and project
- Instead of adding hours, click "Add Charge"
- Enter:
- Description (e.g., "Monthly Retainer - November 2024")
- Amount (e.g., €5,000)
- Charge Type (Fixed Fee, Retainer, Deposit, etc.)
- Add multiple charges if needed
- Review and save the bill
Method 2: Use "Add Row" for Custom Line Items
- Create a new bill for the client
- Click "Add Row" button
- Manually enter:
- Description of service or charge
- Quantity (if applicable)
- Rate or fixed amount
- Total
- Add additional rows as needed
- Review and save
Understanding the "Ready For Billing" Dashboard
The Bills section includes a comprehensive "Ready For Billing" dashboard that helps you identify what's available to invoice:
Dashboard Features:
- Client/Project List - Shows all clients and projects with potential billing activity
- Jobs/Charges Indicators - Orange badges showing job types and counts of unbilled items
- Budget Tracking - Shows project budget, amount already billed, and remaining budget
- Recoverability Percentage - Indicates how much of the budget has been used
- Hours to Bill - Blue badges showing unbilled hours (00:00 if no tracked time)
- Unbilled Cost - Shows the cost value of unbilled work
- Status Indicators - Green/yellow dots showing project readiness
- Export with Project Details - When exporting your "Ready for Billing" list, you can include full Project Details, including any custom fields you've defined
Using the Dashboard:
- Green indicators - Projects with unbilled work ready to invoice
- Yellow indicators - Projects that may need attention or have issues
- Zero hours projects - Projects showing 00:00 hours to bill can still be invoiced with fixed charges
- Team filtering - Use team filter pills to focus on specific departments
- Time range filter - Set to "All Time" or specific periods
When to Create Manual Bills from the Dashboard:
Even if a project shows 00:00 hours to bill, you can still:
- Create retainer invoices for that project
- Bill fixed milestone payments
- Add setup fees or recurring charges
- Invoice advance payments
The dashboard helps you see all projects that exist, not just those with tracked time. Use it to ensure you don't miss billing opportunities for retainer or fixed-fee arrangements.
Best Practices for Manual Billing
Manual Billing Best Practices
Clear Descriptions When billing without time entries, descriptions become even more important. Clearly state what the charge is for: "November 2024 Monthly Retainer," "Project Initiation - Fixed Fee," or "Deposit - 50% of Estimated Project Cost."
Reference Agreements Include references to your contract or agreement in the invoice description or notes. This helps clients immediately understand why they're being billed without seeing detailed time entries.
Consistent Timing Bill retainers and recurring charges on the same schedule every period. Consistency helps clients budget and expect your invoices.
Track Time Internally Even when billing fixed amounts, continue tracking time internally. This data is valuable for profitability analysis, resource planning, and determining whether your fixed-price agreements are sustainable.
Use Appropriate Charge Types Categorize charges correctly (Retainer, Deposit, Fixed Fee, Setup Fee) for better financial reporting and client understanding.
Document Project Budget Set project budgets even for fixed-price work. This helps you monitor whether you're staying within profitable parameters.
Example Scenarios
Scenario 1: Monthly Retainer (No Hours Tracked Yet)
- Go to Bills > Create Bill
- Select client and retainer project
- Click "Add Charge"
- Description: "Professional Services Retainer - December 2024"
- Amount: €10,000
- Save and send on the 1st of the month
Scenario 2: Fixed-Price Project - Initial Invoice
- Create bill for client and project
- Add charge: "Website Development Project - Initial Payment (50%)"
- Amount: €25,000 (50% of €50,000 total project)
- Send before work begins per contract terms
Scenario 3: Setup Fee + First Month Retainer
- Create bill for new client
- Add charge 1: "System Setup and Onboarding - €2,500"
- Add charge 2: "Monthly Retainer - First Month - €5,000"
- Total: €7,500
- Send with welcome packet
Scenario 4: Mixed Billing (Some Hours + Fixed Charges)
- Create bill for client
- Add tracked hours for completed work
- Add charge: "Monthly Platform Fee - €500"
- Add charge: "Document Storage - €200"
- Invoice shows time-based work plus recurring charges
Tips for Better Bills
Best Practices
Preview Before Saving Make reviewing the bill preview a non-negotiable step in your billing process every single time. The preview shows you exactly what will appear on the client's invoice, letting you catch errors, verify that rates applied correctly, ensure descriptions make sense, and confirm the total is what you expected. Catching mistakes at this stage takes seconds, while catching them after the invoice is sent requires embarrassing corrections and damages client confidence.
Clear Descriptions The descriptions on your invoice line items do real work for you. When a client can immediately understand what they're paying for just by reading the line item, approval and payment happen faster. Vague descriptions like "Professional Services" or "Consulting - 40 hours" create questions and delay payment. Specific descriptions like "Annual financial statement preparation for 2024" or "Tax planning consultation for business restructuring" give clients confidence they're being billed appropriately and reduce friction in your billing process.
Group Related Work Invoices with dozens of granular line items - "John, Meeting, 2 hours," "Sarah, Meeting, 1.5 hours," "John, Research, 3 hours" - overwhelm clients and make it harder to understand what they're paying for. Group related work into consolidated line items like "Strategic Planning Session - 15 hours" or "Market Research and Analysis - 22 hours." The amounts remain accurate, but the presentation is dramatically clearer and more professional.
Consistent Timing Bill on a regular, predictable schedule - whether that's weekly, bi-weekly, or monthly depends on your projects, but consistency matters more than frequency. Regular billing improves your cash flow, helps clients budget and expect your invoices, prevents the accumulation of large work-in-progress balances, and makes project profitability tracking more accurate. Set a billing day each week or month and stick to it religiously.
Check Rates Before finalizing any bill, verify that the correct charge-out rates are being applied to each team member's hours. Rate errors can significantly impact your revenue - either leaving money on the table by under-billing, or creating awkward conversations with clients when you've over-billed. A quick rate check takes ten seconds and prevents problems that can damage client relationships.
Add Context For specialized, complex, or high-value work, use the description field to add context that helps justify the charges. Explain what was accomplished, what research was involved, why the work was necessary, or what value was delivered. This additional context is particularly important for work that might appear expensive at first glance but becomes clearly justified when the client understands the complexity and value delivered.
Troubleshooting
Problem: Can't See Any Hours to Bill
Possible causes:
- Hours haven't been approved yet → Ask manager to approve timesheets
- Hours are marked as non-billable → Check timesheet settings
- Date range doesn't include when work was done → Adjust date range
- Hours already billed → Check existing bills
Problem: Wrong Amount Showing
Check these:
- Are correct rates being applied? → Verify charge-out rates
- Are you including the right hours? → Review selected hours
- Is tax calculated correctly? → Check tax settings
- Are there hidden charges? → Review all line items
Problem: Bill Total Differs from Project Cost
You may notice that the total cost shown on the billing page is different from the total cost displayed on the Projects page. This is expected behavior, and there are specific reasons for the difference.
What the billing page shows:
The cost displayed when creating or viewing a bill reflects only the items relevant to that specific bill:
- Unbilled items for the project that are available to be invoiced
- Already-billed items that are in scope of this bill (i.e., items included on this particular bill)
Items that have already been billed on other bills are not shown, since they are no longer relevant to the current billing context.
What the Projects dashboard shows:
The project cost on the Projects dashboard reflects the total accumulated cost of all work on the project, including work that has already been billed across multiple invoices, work that is currently unbilled, and non-billable work.
Common reasons for the difference:
| Reason | Explanation |
|---|---|
| Previously billed work | Hours already invoiced on other bills won't appear on the billing page, but they count toward the project's total cost |
| Unapproved timesheets | Work logged in timesheets that haven't been approved yet will contribute to the project's total cost but won't appear on the billing page, since only approved hours are available for billing |
| Non-billable work | Time logged as non-billable contributes to the project cost but does not appear in the billing view by default |
| Partial billing | If you cherry-picked specific hours for previous bills, the remaining unbilled hours will be less than the project total |
Viewing non-billable work on the billing page:
Non-billable work is hidden by default when creating a bill since it won't be invoiced. However, you can expose it for reference:
- While viewing or creating a bill, find the unbilled jobs table
- Click the three dots icon (⋮) on the relevant job row
- Select Show Non-Billable Work
This reveals the non-billable hours logged against that job, helping you understand the full picture of effort spent versus what is being billed. This is useful for internal cost analysis and understanding the gap between total project cost and billable amounts.
Problem: Wrong Client Address on a Bill
The address shown on a bill is pulled from the client's primary address in their client profile. You cannot edit the address directly on the bill itself.
To update the address:
- Navigate to the Clients' page (click Clients in the left sidebar)
- Click on the client to open their Client Dashboard
- Click the three dots icon (⋮) next to the client name
- Select Edit Profile
- Update the address that is marked as the primary address
- Save the changes
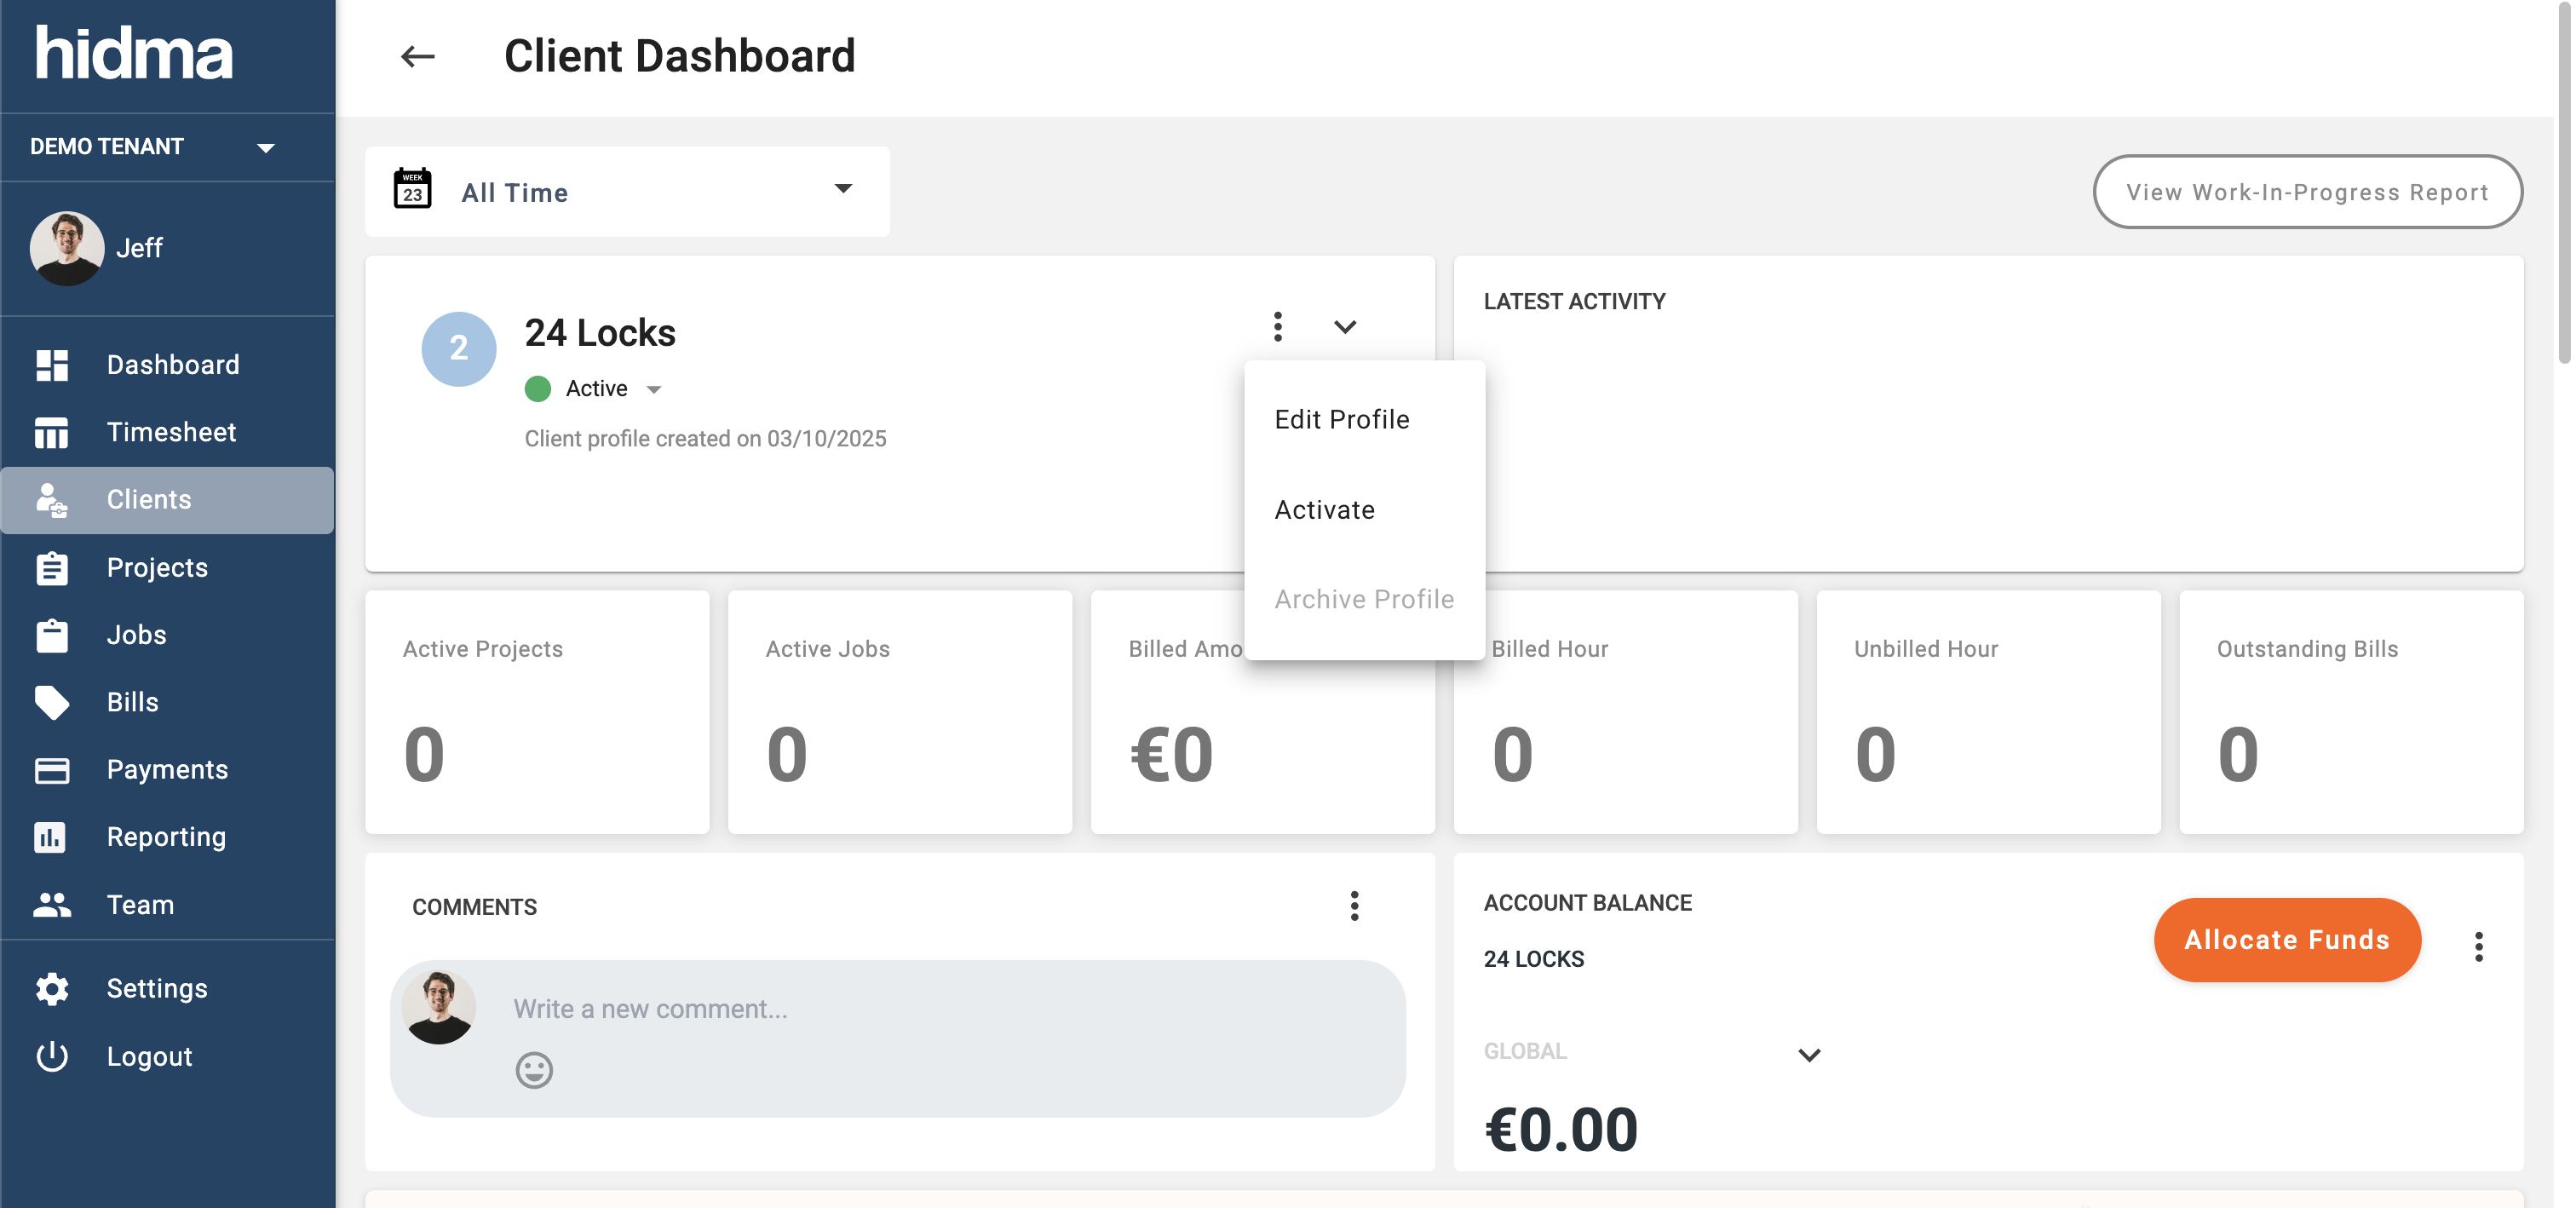
Any new bills created for that client will now use the updated primary address. If you need to correct the address on an existing bill that hasn't been sent yet, update the client profile first, then the bill will reflect the new address.
Tip
If a client has multiple addresses (e.g., head office and branch office), make sure the correct one is set as the primary address before creating bills.
Problem: Can't Create a Bill
Possible reasons:
- No permission → Contact administrator about your role
- Client not set up → Add client first
- Project inactive → Activate project in settings
- No approved hours available → Get timesheets approved first
Related Topics
Next Steps
- Send Bills to Clients - How to deliver invoices
- Record Payments - Track when paid
- Closing Hours Against Bills - Mark hours as billed
Advanced Billing
- Repeatable Charges - Set up recurring items
- Document Templates - Customize invoice appearance
- Grouping Bill Items - Organize line items
Financial Management
- Partial Allocations - Handle partial payments
- Credit Notes - Issue credits
- Write-offs - Write off amounts
Need Help?
Watch the video tutorials linked at the top of this page, or contact your administrator for account-specific questions.