
Appearance
Cherry Pick User Hours
Select specific hours from specific users when creating bills, giving you precise control over what gets invoiced.
🎥 Video Tutorial
Watch the Video
Video: Billing: Cherry pick user hours.mp4 Duration: 18 seconds Topics Covered: Selecting individual hours, choosing specific users, filtering billable time
What You'll Learn
- How to selectively choose hours to bill instead of adding all time
- Why you might want to cherry-pick hours
- How to choose specific team members' hours
- How to adjust hour amounts per user
When to Use Cherry Picking
Cherry picking hours becomes essential in several common billing situations where you can't or shouldn't bill all the tracked time in one go.
When your client has a budget cap - a maximum amount they're willing or contractually obligated to pay - you need to carefully select which hours to include on the invoice to stay within that limit. Perhaps you tracked 80 hours of work worth $12,000, but the client's budget is capped at $10,000. Cherry picking lets you select exactly which hours to bill to reach that maximum without exceeding it.
Split billing arrangements often require cherry picking as well. Maybe you bill a retainer client twice per month - mid-month and month-end - which means you need to divide the tracked work between two invoices. Or perhaps you're working on a phased project where different portions of the work get billed on different schedules. Cherry picking ensures you include the right work on each invoice while keeping the rest available for future billing.
Sometimes only certain team members' time should be invoiced to the client. Senior staff might be billable while junior staff time is considered internal training and development. Or perhaps a project manager's time is included in a fixed fee, so you only want to bill the actual execution team's hours. Cherry picking lets you select specific people's contributions while excluding others.
Excluding certain work is another common need. Maybe some tasks ended up being outside the original scope and you need to discuss them separately with the client before billing. Or perhaps your team did some work that was later deemed non-billable due to errors or rework that shouldn't be charged to the client. Cherry picking helps you separate billable work from work that should be handled differently.
Finally, when you've quoted a fixed price but want to track actual time for internal project management purposes, cherry picking lets you bill the agreed amount while maintaining accurate records of effort expended. You can select a subset of hours that matches your quote, leaving the rest tracked but unbilled for your own profitability analysis.
Before You Start
Cherry picking hours requires a few prerequisites to be in place. Time must already be tracked and entered into timesheets by your team members - you can't cherry-pick hours that don't exist in the system yet. Those timesheets need to have gone through the approval workflow, with a manager reviewing and approving the entries, since unapproved time isn't available for billing. You should be on the bill creation screen with your client and project already selected, which surfaces all the available unbilled work. And finally, when you look at the job list on that screen, you should see unbilled hours available - if nothing shows up, it might mean everything's already been billed, the date range is wrong, or timesheets haven't been approved yet.
Step-by-Step Instructions
Step 1: Start Creating a Bill
- Click Bills in the left sidebar
- Click "+ Add new" or "New Bill"
- Select the client you're billing
- Choose the project
- Select your date range to show available unbilled hours
You'll see a list of jobs with tracked time.
Step 2: View Available Hours
On the main screen, you'll see a table showing:
| Column | What It Shows |
|---|---|
| Job | The job/task name (e.g., "Reconciliation", "VAT Return", "Postings") |
| Users | Who worked on this job |
| Total Hours | Total unbilled hours available |
| Cost | Calculated cost based on rates |
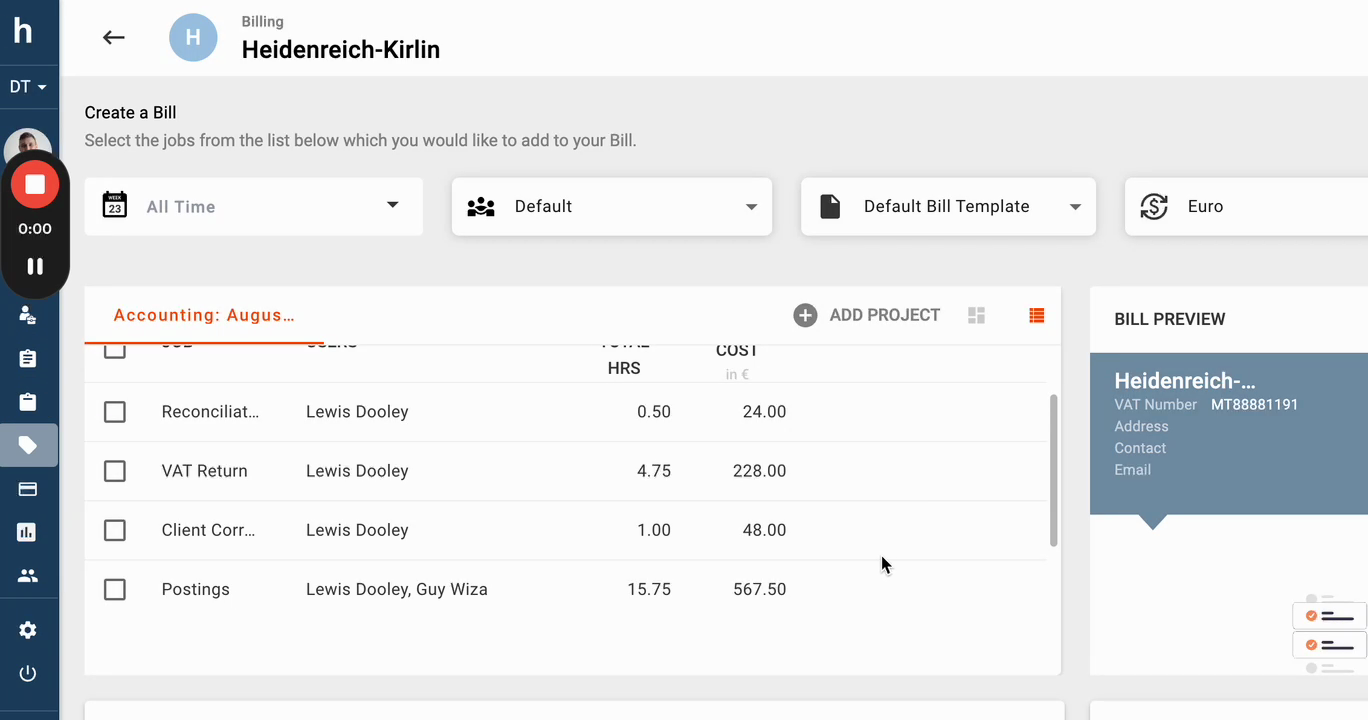
Each row represents a job with unbilled hours. You can select entire jobs or dig deeper to choose specific users.
Step 3: Choose "Specify Hours" for a Job
Instead of clicking the checkbox to add all hours for a job, you want to cherry-pick:
- Hover over a job row - You'll see additional icons appear
- Click the "+" icon or "Specify hours" button on the right side of the row
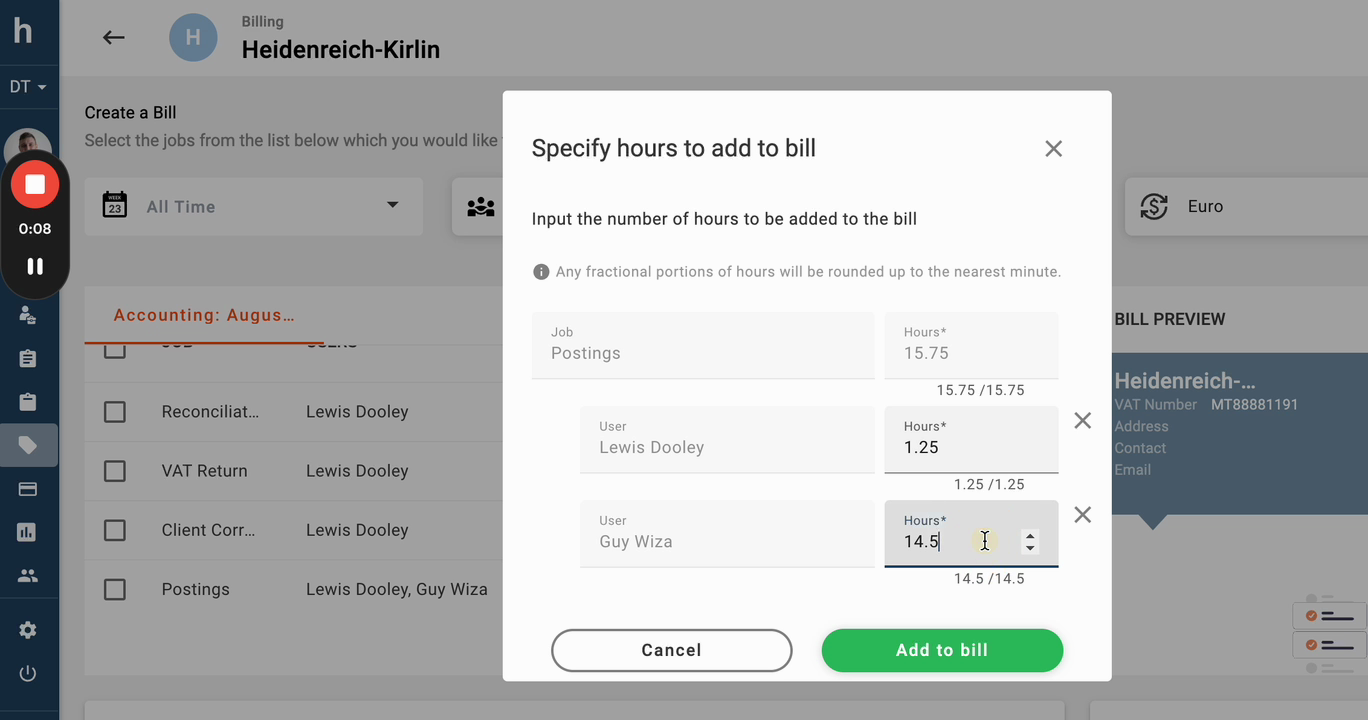
- A modal dialog will open: "Specify hours to add to bill"
Step 4: Adjust Hours Per User
The dialog shows:
For each user who worked on this job:
- User name
- Total available hours
- Input field to specify how many hours to bill
To cherry-pick hours:
Review the available hours for each user
- Example: "Lewis Dooley: 15.75 hours available"
- Example: "Guy Wiza: 14.5 hours available"
Enter the hours you want to bill for each user
- You can bill the full amount, partial amount, or zero
- Enter
0or leave blank to exclude that user entirely - Enter any amount up to their available hours
See the running total - The dialog shows "15.75 / 15.75" indicating you've specified 15.75 out of 15.75 available
Pro Tip
You don't have to bill all available hours. For example, if someone worked 20 hours but you only want to bill 15, just enter 15.
Step 5: Confirm Your Selection
- Review your entries - Make sure the hours for each user are correct
- Click "Add to bill" (green button)
The modal closes and you'll return to the bill creation screen.
Step 6: Review the Updated Bill
Back on the main screen:
- The job row now shows updated hours
- Individual user rows appear with the specific hours you selected
- The bill preview on the right updates with line items
- You can see the exact breakdown per user
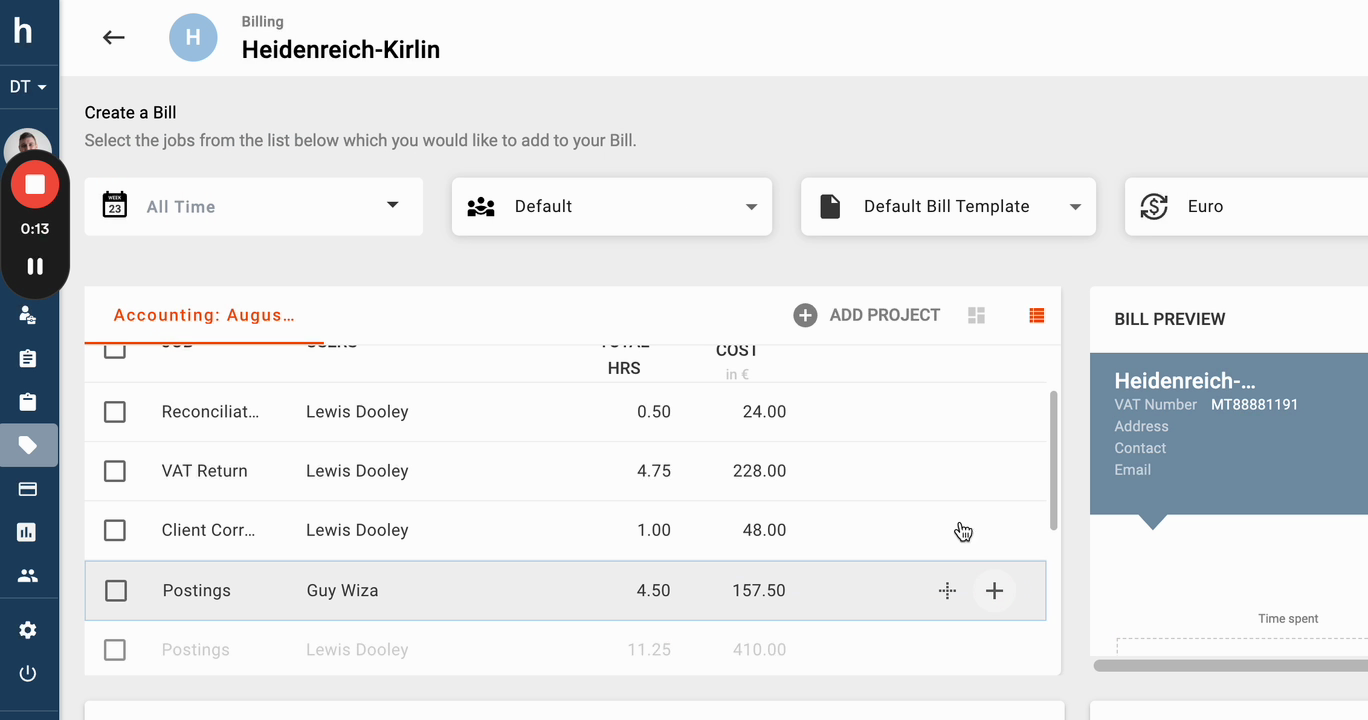
Notice:
- "Guy Wiza" shows 4.50 hours for €157.50
- "Lewis Dooley" shows 11.25 hours for €410.00
- Hours were split based on your selection
Step 7: Continue Building Your Bill
You can:
- Cherry-pick hours from other jobs - Repeat the process
- Add entire jobs - Click checkbox to add all hours from a job
- Add additional charges - Fixed fees, expenses, discounts
- Preview the invoice - Check the bill preview on the right
Step 8: Generate the Bill
When satisfied:
- Review the Bill Preview on the right side
- Check the total amount
- Click "Generate Bill" or "Save"
Understanding the Interface
Main Bill Creation Screen
┌─────────────────────────────────────────┬─────────────────┐
│  Job List (Available Unbilled Hours)    │  Bill Preview   │
│                                          │                 │
│  ☐ Reconciliation  Lewis  0.50h  €24    │  Client Info    │
│  ☐ VAT Return     Lewis   4.75h  €228   │  Invoice #      │
│  ☐ Client Corr... Lewis   1.00h  €48    │  Line Items     │
│  ☐ Postings       Multiple 15.75h €567  │  Subtotal       │
│                                          │  VAT            │
│  [+ ADD PROJECT]              [Grid/List]│  Total          │
└─────────────────────────────────────────┴─────────────────┘
Specify Hours Dialog
When you click to cherry-pick a job:
╔══════════════════════════════════════════╗
║  Specify hours to add to bill        ✕  ║
║                                          ║
║  Input the number of hours to be added   ║
║  ⓘ Fractional hours rounded to minute    ║
║                                          ║
║  Job: Postings                15.75 hrs  ║
║                                          ║
║  User: Lewis Dooley          Hours*      ║
║  [    1.25    ] ✕           1.25/1.25    ║
║                                          ║
║  User: Guy Wiza              Hours*      ║
║  [    14.5    ] ✕           14.5/14.5    ║
║                                          ║
║  [ Cancel ]          [ Add to bill ]     ║
╚══════════════════════════════════════════╝
Common Scenarios
Scenario 1: Client Has a Budget Cap
Situation: Client agreed to pay maximum €5,000 but your team logged €6,500 worth of time.
Solution:
- Calculate the ratio: €5,000 / €6,500 = 77%
- Cherry-pick 77% of each user's hours
- Mark remaining hours as "internal" or bill on a future invoice
Scenario 2: Some Work Was Out of Scope
Situation: Team worked on additional tasks not covered by the agreement.
Solution:
- Identify which hours are in-scope
- Cherry-pick only the approved work
- Discuss out-of-scope work separately with client
Scenario 3: Billing Multiple Team Members Differently
Situation: Senior staff time is billable, junior staff is internal learning.
Solution:
- For each job, click "Specify hours"
- Enter full hours for senior staff
- Enter
0hours for junior staff - The junior hours stay unbilled
Scenario 4: Splitting Work Across Two Invoices
Situation: Monthly retainer - you bill half the work on the 15th, half at month-end.
Solution:
- Mid-month: Cherry-pick 50% of each person's hours
- Month-end: The remaining hours will still be available to add to next bill
Tips & Best Practices
Pro Tips
Review Before Adding Make it a habit to carefully review the hour amounts you've entered before clicking "Add to bill" - this is your last chance to catch errors before those hours get locked into the invoice. The dialog helpfully shows available versus selected hours (like "14.5 / 14.5") so you can quickly verify you're billing the right amount. Once you click that button and the modal closes, those hours are committed to this draft bill, and while you can still edit before finalizing, it's easier to get it right the first time.
Communicate with Client When you're excluding significant hours from an invoice through cherry picking, transparent communication with your client builds trust and prevents confusion. Let them know why certain work isn't appearing on this invoice - whether it's because you're spreading costs across multiple bills, staying within a budget cap, or excluding work that needs to be discussed separately. Keep internal notes documenting what was included and excluded on each invoice, which proves invaluable months later when questions arise about billing history.
Track Unbilled Hours Hours you choose not to bill on the current invoice don't disappear - they remain available in the system for future bills, continuing to show up in your unbilled hours list until you either invoice them or explicitly mark them as non-billable. Make it a regular practice to check the Work in Progress (WIP) Report to see all unbilled time across your clients and projects. Large WIP balances represent money you've earned but haven't collected, and monitoring this closely ensures you don't let too much unbilled work accumulate. Check the WIP Report
Use Round Numbers Clients tend to appreciate clean, round numbers on their invoices rather than precise decimals. An invoice line showing "10.00 hours" feels more professional and intentional than "9.75 hours," even though both represent legitimate work. When cherry picking hours, consider rounding down slightly - billing 10 hours instead of 10.25, for example - which costs you very little but can improve client perception and relationships. This small gesture of goodwill often pays dividends in client satisfaction and prompt payment.
Combine with Other Methods Cherry picking doesn't have to be an all-or-nothing approach for your entire bill. You can cherry-pick hours for jobs where you need precise control - perhaps because of budget constraints or selective billing requirements - while clicking "Add All" for other jobs where you're billing everything. This mixing and matching of approaches on the same bill gives you maximum flexibility to handle each piece of work appropriately while still creating a single, cohesive invoice.
Be Careful
Don't Double-Bill
- Once hours are on a bill, they won't show as available again
- If you delete a draft bill, hours become available again
Check Rates
- Cherry-picking doesn't change rates, only quantities
- Rates are determined by charge-out rate settings
Client Expectations
- Make sure your cherry-picking aligns with what client expects
- Document your billing methodology
Common Questions
Q: Can I cherry-pick hours from multiple users on the same job? A: Yes! The "Specify hours" dialog shows all users who worked on that job. You can enter different amounts for each person.
Q: What happens to hours I don't bill? A: They remain unbilled and available for future invoices. You can bill them later or mark them as non-billable.
Q: Can I go back and change cherry-picked hours before saving the bill? A: Yes, while the bill is still in draft status. Click the job again and adjust the hours.
Q: How do I know which hours are available vs. already billed? A: Hidma automatically filters out already-billed hours. You only see unbilled time in the job list.
Q: Can I cherry-pick by date range instead of by user? A: The date range filter is at the top of the bill creation screen. Cherry-picking is then by user within that range. You can't select specific days within the range for a user.
Q: What if I want to bill MORE than the tracked hours? A: You can't bill more tracked hours than exist. Instead, use "Specify hours to add" to add a fixed amount regardless of tracked time, or add a manual charge.
Q: Is there a way to see what I've already cherry-picked? A: Yes, look at the job rows after you've added hours. They'll show the selected amounts. The Bill Preview on the right also shows all line items.
Troubleshooting
Problem: Don't See the "Specify Hours" Option
Possible causes:
- No unbilled hours available for that job
- Date range doesn't include when work was done
- Hours already on another draft bill
Solutions:
- Check date range selector at top
- Verify timesheets are approved
- Look for other draft bills that might include these hours
Problem: Hours Don't Add Up Correctly
Cause: Multiple users worked on the job
Solution: Click "Specify hours" to see the breakdown per user. The total shown is the sum of all users.
Problem: Can't Enter Fractional Hours
Note: You can enter fractional hours (e.g., 1.5, 2.25). They'll be rounded to the nearest minute.
Problem: Changes Aren't Saving
Cause: You're in the "Specify hours" modal
Solution: Click "Add to bill" to apply changes. The modal must close for changes to take effect.
Related Topics
Other Ways to Add Hours to Bills
- Add All Hours - Include all unbilled time for a job
- Specify Hours to Add - Enter a fixed amount regardless of tracked time
- Grouping Bill Items - Consolidate line items for cleaner invoices
Managing Unbilled Work
- Client WIP Report - See all unbilled hours by client
- Closing Hours Against Bills - Mark hours as billed
- Non-Billable Hours - Exclude time from billing
Rate Management
- Charge-out Rates - How rates are applied
- Discounts and Charges - Adjust bill amounts
What's Next?
After cherry-picking hours:
- Review and finalize the bill
- Add discounts or charges if needed
- Generate and send the invoice
- Record payment when received
Need More Help?
- Watch the video tutorial at the top of this page (18 seconds)
- Practice with a test client first
- Contact support if you have questions about billing rules