
Appearance
Integrations
Connect Hidma with other tools to streamline your workflows and reduce manual data entry.
🎥 Video Tutorial
Watch a complete walkthrough of setting up the XERO integration.
XERO Integration
Xero is an online accounting software for small businesses. Save time by connecting Xero with Hidma to automatically sync your billing data, clients, and payments.
Hidma's First Integration
XERO is Hidma's first third-party integration! We're starting with one of the most popular accounting platforms to help streamline your financial workflows. More integrations may be added in the future.
What is XERO Integration?
The XERO integration provides two-way synchronization between Hidma and your Xero accounting system. Use Hidma to manage your projects, timesheets, and invoices, then integrate with Xero to file your tax returns and process payroll. The integration eliminates duplicate data entry and ensures your accounting records stay current with your project management activities.
What Gets Synced
When you connect Hidma to Xero, the following data automatically synchronizes:
From Hidma to Xero:
- Customers/Clients - Client records created in Hidma immediately appear in Xero (including contact details)
- Invoices - Bills generated in Hidma sync as invoices in Xero
- Invoice Line Items - All billing details, descriptions, and amounts
- Tax Codes - Applied according to your mapping configuration
- Payments - Payments recorded in Hidma sync to Xero
From Xero to Hidma:
- Payments - Payments recorded in Xero update invoice status in Hidma
- Payment Allocations - Payment applications to specific invoices
- Bills - Can be automatically synced from Xero (when enabled)
Improved Client Sync
When integrated with XERO, creating a new client in Hidma now immediately copies both the client and its contact details to Xero. This ensures your client information stays synchronized without delays.
Setting Up XERO Integration
Prerequisites
Before connecting to Xero, ensure you have:
- Admin or Team Account - You'll need to sign in with an admin-level Xero account
- Xero Subscription - An active Xero account
- Service Account Email - Use a consistent team or service account email (not personal email)
- Billing Permissions - Appropriate permissions in Hidma to access Settings
Important: Service Account Email
Always use a team or admin account email when connecting to Xero, not a personal email address. This ensures the integration continues working even if individual team members leave or change roles. If multiple team members need to access the integration, they should all use the same service account credentials.
Step-by-Step Connection Process
Navigate to Integrations
- Go to Settings in the left sidebar
- Click Integrations
- Find the XERO Integration section
Access XERO Integration Page
- You'll see a description of XERO and its benefits
- The page explains the two-way sync functionality
- Click the blue "Connect to Xero" button
Email Validation
- A dialog appears: "Email address for Integration"
- Instructions remind you to use a team or admin account
- Click "Continue to Xero"
Xero Authentication
- You'll be redirected to Xero's login page
- Sign in with your Xero admin credentials
- Xero will ask you to authorize Hidma to access your account
Select Xero Organisation
- Choose which Xero organisation to connect (e.g., your company name)
- If you have multiple organisations in Xero, select the correct one from the dropdown
Grant Permissions
- Review the permissions Hidma is requesting
- Click "Allow access" to grant access
- You'll be redirected back to Hidma
Confirm Connection
- Back in Hidma, you should see confirmation that the connection succeeded
- The setup wizard will launch automatically to guide you through configuration
Setup Wizard
After connecting, Hidma launches a three-step setup wizard to configure how data maps between the two systems. A progress bar at the top shows your current step.
Step 1: Tenant Settings
Organisation Mapping
Select which Hidma organisation to link to the connected Xero account. The system shows which Xero account will link to which Hidma organisation.
Sync Settings
Choose which data types to sync. Clients are synced by default. You can also enable:
- Bills - Sync invoices between systems
- Payments - Sync payment records between systems
Tick the checkboxes for each data type you want to synchronize, then click Next.
Step 2: Mapping Settings
The mapping step has several sub-screens. For each one, the system automatically maps items with matching names between Hidma and Xero. You only need to manually adjust items that don't match. Each screen shows NOT MAPPED and MAPPED counts so you can track progress.
Client Mapping
Maps your Hidma clients to Xero contacts. The system auto-matches clients with the same name. For unmatched clients, click the dropdown on the Xero side to:
- Do not Sync/Map Client - Skip this client (won't sync)
- Create New Client - Create a new contact in Xero
- Select an existing Xero contact to map to
TIP
Check all pages of the client mapping before proceeding. Use the pagination controls and search bar to find specific clients.
Tax Rate Mapping
Maps Hidma tax rates to Xero tax codes. Auto-matched rates appear with green checkmarks. For unmatched rates, select the corresponding Xero tax code from the dropdown, or choose "Do not Sync/Map." You can also create a new tax rate in Xero using the "Paste New Tax Rate" option.
Currency Mapping
Maps currencies used in Hidma to their Xero equivalents. If you operate in multiple currencies, ensure each one is correctly mapped. Unmapped currencies won't sync properly on invoices.
Document Configs Mapping
Maps Hidma document configurations (such as "Group By Project," "Group by rows original," or "Group By Rows") to their Xero equivalents. This controls how invoice line items are structured when they appear in Xero.
Billing Setup
This is a critical step where you choose your primary system for recording payments — either Xero or Hidma. When you select Xero as the primary system:
- All payments in Hidma will be cleared
- All pre-payments and over-payments in Xero will be copied to Hidma
- All bills which are mapped with all payments in Xero will also be copied to Hidma
- Any bills which are not synced will have payments created against them in Hidma and marked as paid
You must acknowledge and agree to these conditions by ticking the checkboxes before proceeding.
Important
Choosing a primary payment system determines which system is the source of truth for payment data. Think carefully before selecting, as this affects how existing payment data is handled during the initial sync.
Billing Mapping
Maps existing bills between Hidma and Xero. The system shows your Unpaid Bills and Paid Bills separately, auto-matching by similar details (client, amount, and date). For each bill, you can:
- Accept the suggested mapping (green checkmark)
- Choose "Do not Sync/Map Bill" to skip it
- Select a different Xero invoice to map to
Any bills that are not synced will have payments created against them in Xero and marked as paid.
Bank Account Mapping
Maps your Hidma bank accounts to Xero bank accounts. The system auto-matches accounts with the same name. If accounts don't match, manually select the correct Xero bank account from the dropdown. A warning appears if some accounts don't match — you can assign them manually or dismiss the warning.
Step 3: Other Settings — Accounts
Configure which Xero accounts to use for different transaction types.
Default Accounts
- Revenue Account - The default Xero account for invoice revenue (e.g., "200 - Sales")
- Payment Account - The default Xero bank account for recording payments (e.g., "ABC Current Account")
- Write-off Account - The default Xero account code for write-offs. If you have payment sync enabled, write-offs will sync correctly across both systems. Set this for each Xero connection under Settings → Integrations → Xero.
Account Code Exceptions (Optional)
Override the default accounts for specific categories:
- Charge Exceptions - Route specific charge types (e.g., Disbursement, Deposit, Discount, Project Management Fee) to different Xero accounts (e.g., "453 - Office Expenses" for disbursements)
- Client Exceptions - Assign specific clients to different revenue accounts (e.g., a particular client's revenue goes to "260 - Other Revenue")
- Job Exceptions - Route specific job types to different accounts
- Team Exceptions - Route revenue from specific teams to different accounts
Click "Add Charge Exception", "Add Client Exception", "Add Job Exception", or "Add Team Exception" to create each override. Click Finish when done.
Advanced Configuration
Account Code Exceptions at Project Template Level
You can now assign Account Code Exceptions for XERO integrations at the project template level. When bill rows are created from projects associated with these templates, the appropriate account code will be automatically applied.
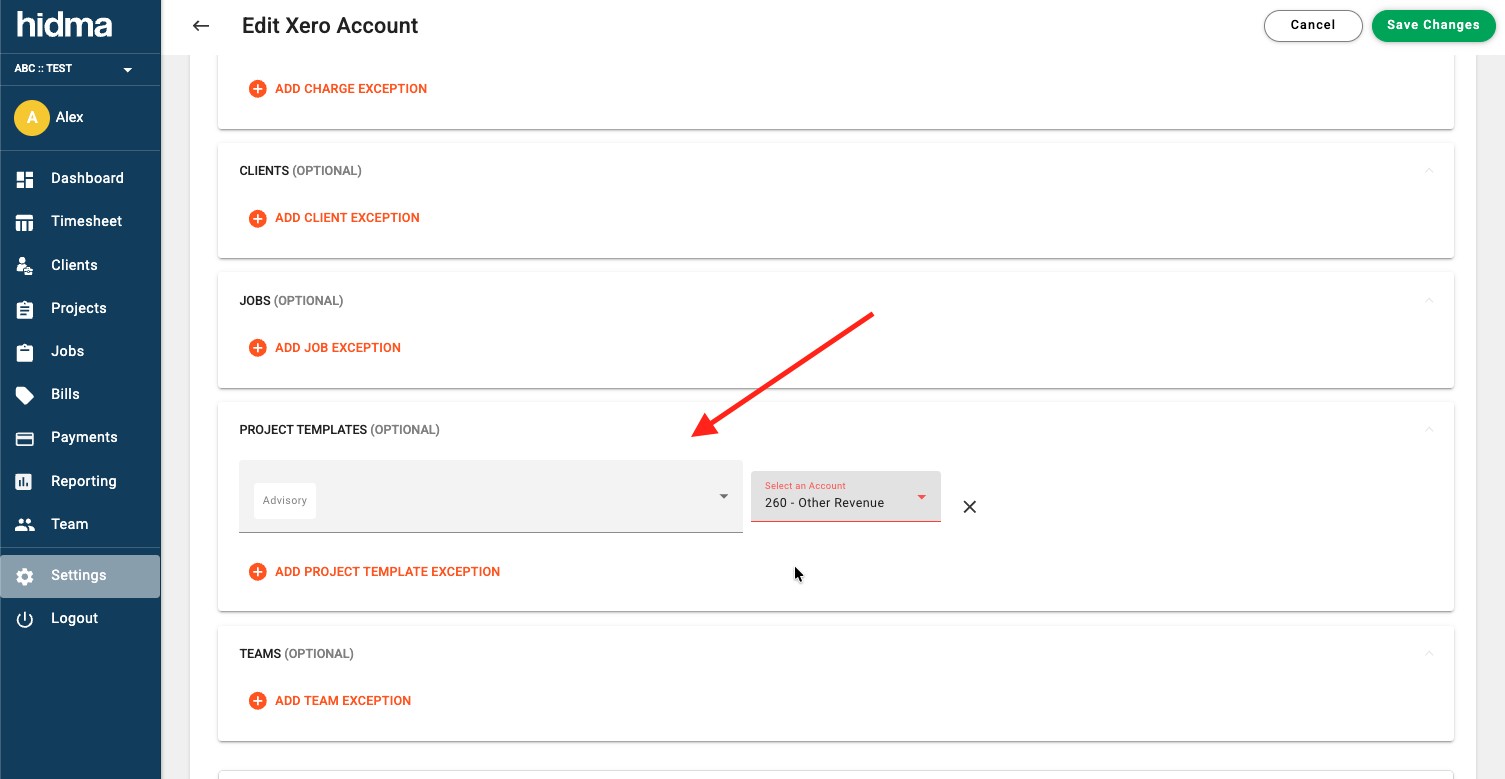
This feature is particularly useful when:
- Different service types require different accounting codes
- You want to automate account code assignment based on project type
- You need to ensure billing consistency across similar projects
To configure account code exceptions:
- Go to Projects → Project Templates
- Edit the relevant template
- Configure the Account Code Exception for XERO
- Save the template
Now, whenever bills are created for projects using this template, the correct account code will be automatically applied.
Bill Submission and Authorization Permissions
Additional permissions have been introduced for submitting and authorizing bills in XERO. These permissions allow for greater control over which users can finalize bills in XERO from within Hidma.
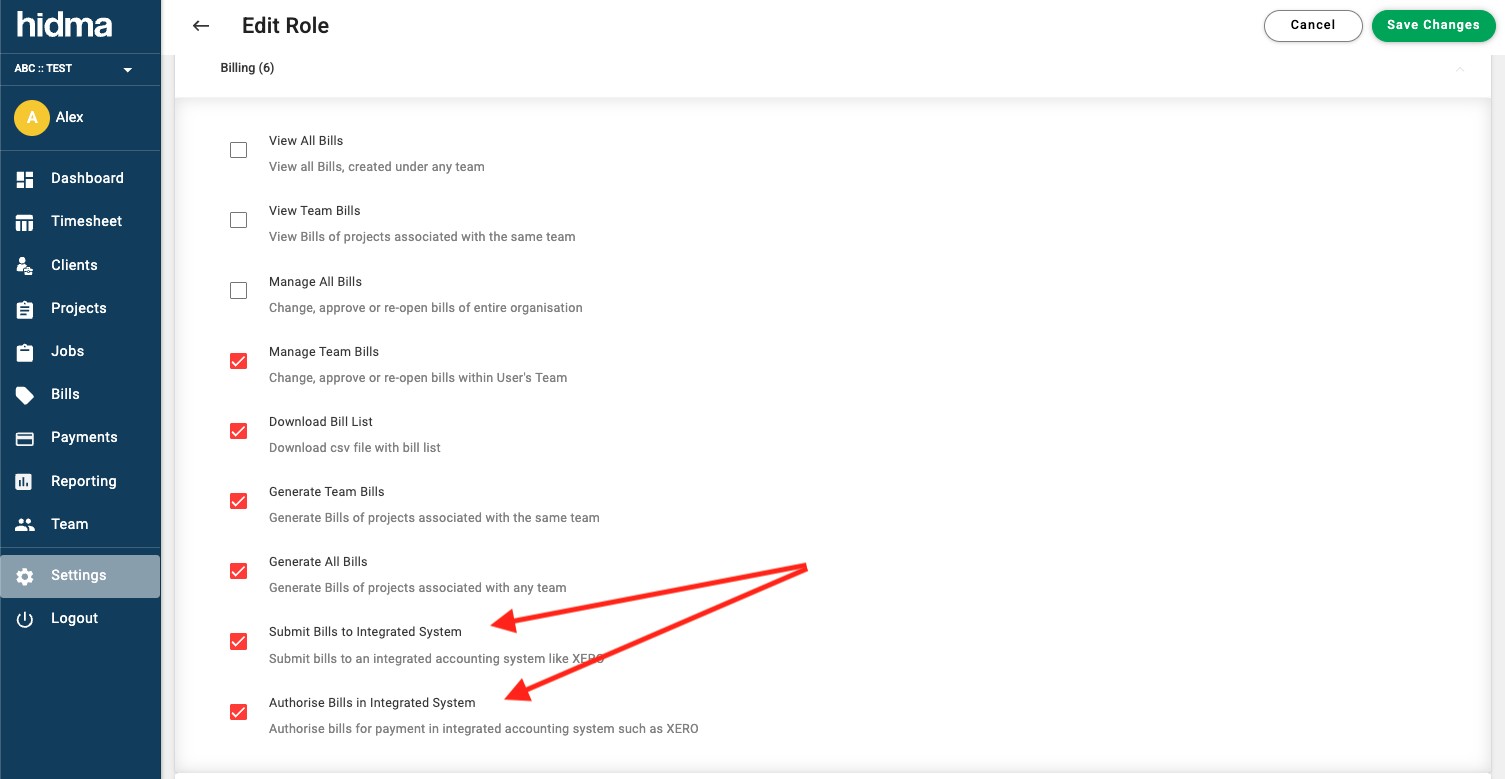
Available permissions:
- Submit Bills to XERO - Control who can send finalized bills to XERO
- Authorize Bills in XERO - Control who can approve and authorize bills once in XERO
These granular permissions help maintain proper approval workflows and prevent unauthorized bill submissions to your accounting system.
To configure these permissions:
- Go to Settings → Roles & Permissions
- Edit the relevant user role
- Enable or disable XERO bill submission and authorization permissions
- Save changes
Ongoing Sync Settings
After the initial setup, you can manage what syncs automatically on an ongoing basis. Go to Settings → Integrations → XERO and click the settings icon to open the Edit Xero Account page.
The page shows toggle switches for two-way sync categories:
Ongoing Sync from Hidma to Xero:
- Automatically sync new Tax Rates
- Automatically sync new Currencies
- Automatically sync new Document Configs
Ongoing Sync from Xero to Hidma:
- Automatically sync new Tax Rates
- Automatically sync new Currencies
- Automatically sync new Document Configs
Toggle each setting on or off depending on your needs. This page also lets you manage your Default Account Codes and account exceptions after the initial setup.
Notification Settings
Configure how your team gets notified about Xero sync events. Go to Settings → Integrations → XERO and access Xero Settings.
Xero Notifications can be toggled on or off globally. When enabled, choose who receives notifications:
- All users - Everyone in your Hidma organisation
- A selected group of users - Specific users or teams (select from the Users/Teams dropdown)
Types of notification:
- Email - Receive email alerts for Xero sync events
- Alert in Hidma - Receive in-app notifications within Hidma
Notifications alert your team when new contacts are detected from Xero, sync errors occur, or other integration events need attention.
Client Profile Integration View
When a client is mapped to a Xero contact, the client's profile in Hidma shows an Integrations section displaying the linked Xero account. This confirms the mapping is active and lets you manage it directly from the client profile. You can delete or reconfigure the mapping using the icons next to the Xero account name.
To add a further mapping - for example to a second Xero tenant - click + Add Integration. The Add another Integration dialog asks for the application (xero), the Xero tenant, and then the contact to map to. The contact dropdown is searchable ("Filter by name or code…") and, alongside every existing Xero contact, offers two actions:
- Create New Client - create a brand-new contact in Xero using the Hidma client's name
- Change name in Hidma & create a new entry in Xero - rename the client in Hidma first, then create the Xero contact under the new name
Guided Error Handling for Client Mapping
Mapping clients to Xero used to fail late and opaquely. Problems are now detected and flagged the moment you save, with the specific cause named and a route to fixing it offered in the same dialog.
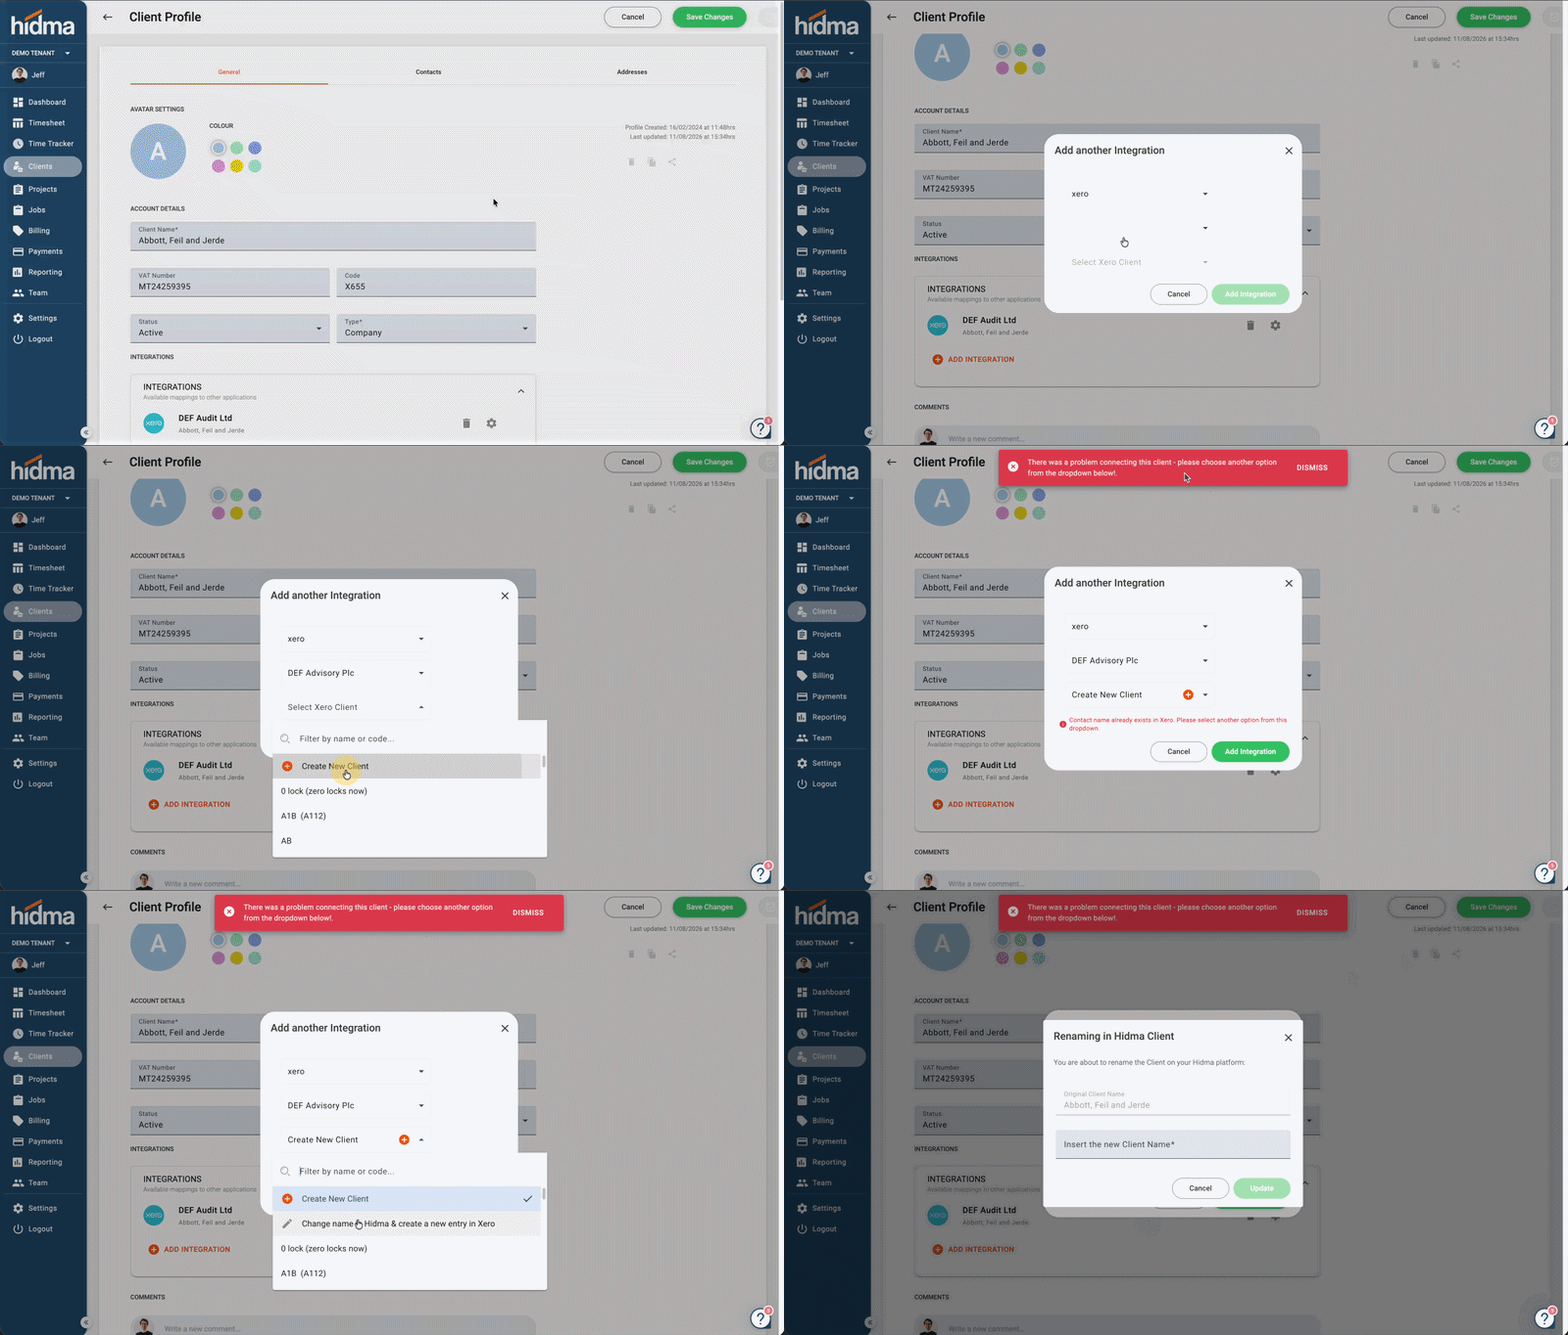
Duplicate contact names. Xero requires contact names to be unique across all active contacts. If the name is already taken - a common situation when you work across multiple Xero tenants and the same client name exists in more than one - Hidma reports it inline rather than failing silently:
- A banner appears at the top of the screen: "There was a problem connecting this client - please choose another option from the dropdown below!"
- The dropdown itself is flagged: "Contact name already exists in Xero. Please select another option from this dropdown"
- Hovering the warning explains precisely which name is at fault: "The contact name [name] is already assigned to another contact. The contact name must be unique across all active contacts."
Pre-existing mappings. If the client is already mapped, that's surfaced immediately on save too, so you don't create a duplicate or conflicting link.
Resolving from the same dialog. You don't need to leave and fix things elsewhere. From the flagged dropdown you can pick a different existing Xero contact, or choose Change name in Hidma & create a new entry in Xero - which opens the Renaming in Hidma Client dialog showing the Original Client Name and a field for the new one. Click Update and Hidma renames the client and creates the matching Xero contact in one step.
Multiple tenants make duplicate names likely
If you run several Xero tenants, expect name collisions - the same client often exists in more than one. The rename option is usually the cleanest fix, since it makes the Hidma-side name unambiguous about which entity it belongs to.
Automatic Bill Sync from XERO to Hidma
You can now enable automatic copying of bills from XERO to Hidma, both during the initial mapping process and on an ongoing basis.
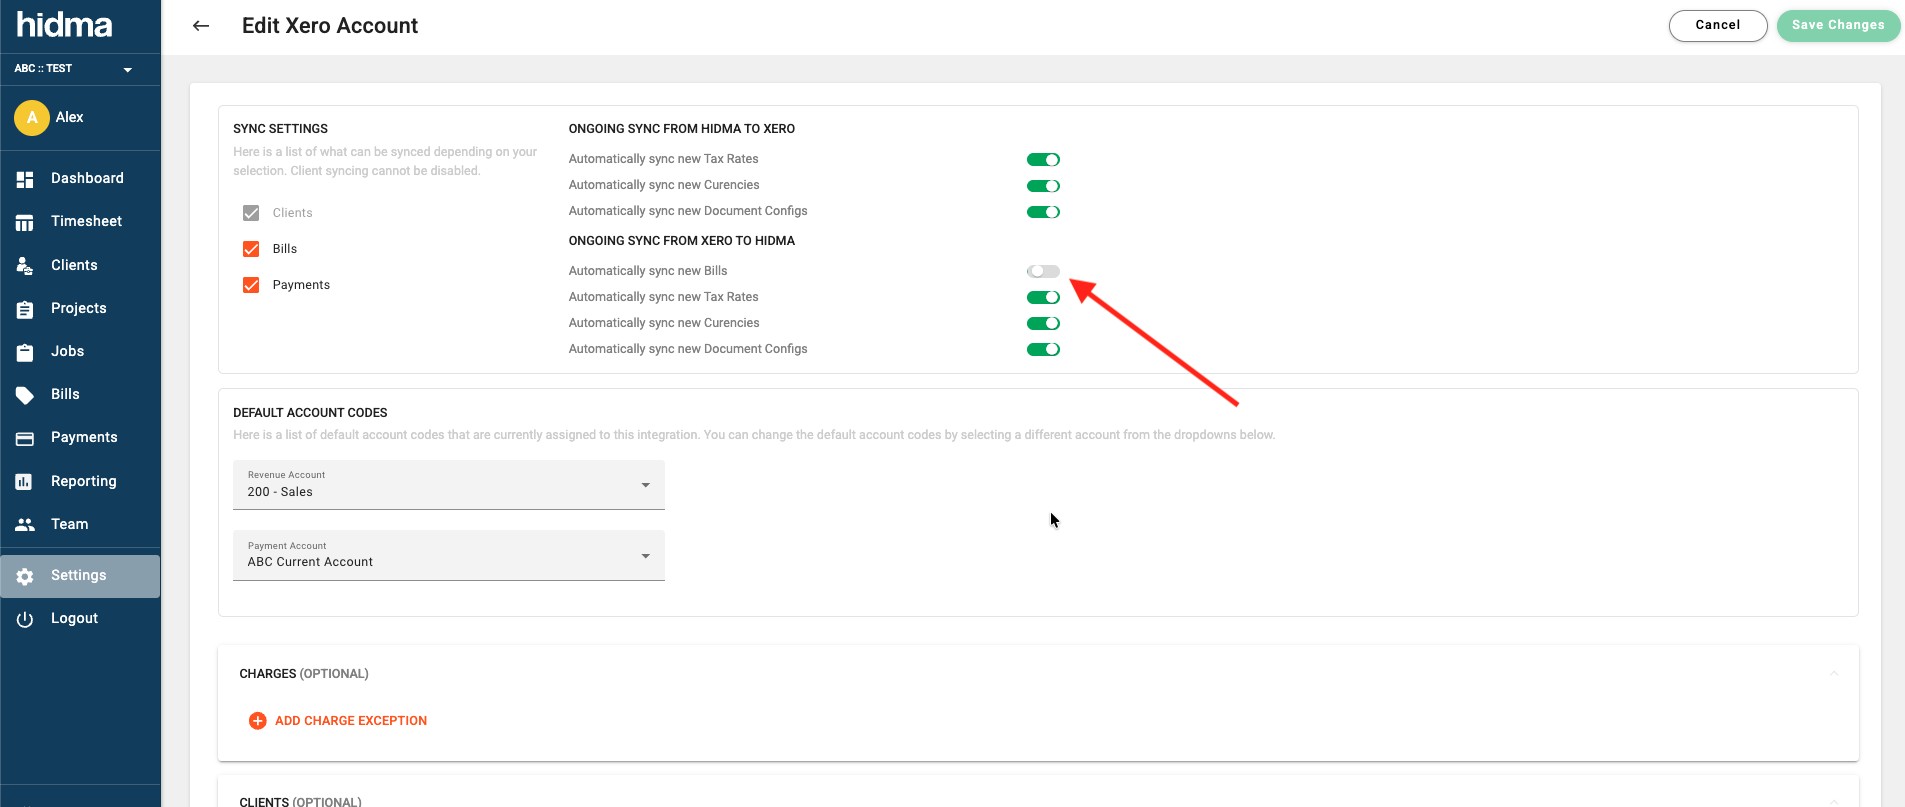
To enable this for an existing integration:
- Go to Settings → Integrations → XERO
- Select the integration you wish to configure
- Under Ongoing Sync from XERO to Hidma, enable "Automatically sync new Bills"
- Click Save
Important Note
Bills copied from XERO to Hidma will be created against the mapped client but will not be allocated to any projects. Project allocation to any of these bills must be performed manually.
Benefits of automatic bill sync:
- Keep Hidma records up-to-date with XERO transactions
- Maintain a complete billing history in Hidma
- Simplify reconciliation between systems
- Track all client billing activity in one place
Smarter Validation for Xero Bills
When you attempt to create a bill with unmapped items, Hidma now provides clear, actionable feedback instead of a generic error. You'll be prompted if the Client, Tax Rate, or Document Template need to be connected to Xero before the bill can be pushed.
Watch how smarter validation helps you fix Xero sync errors directly from the bill screen.
For example, if a client isn't connected to a Xero contact, Hidma will prompt you to search for an existing contact with the same name in Xero, or create and map a new one. The same guided flow applies for unmapped tax rates and document templates.
Xero Workflow Protection
To protect accounting integrity, Hidma can block the deletion or cancellation of a bill in Hidma while the corresponding Xero invoice is Authorized but still unpaid. This stops a Hidma user from voiding an invoice locally while the Xero side is still live and awaiting payment, which would leave the two systems out of step.
This is a tenant-wide setting. Contact [email protected] if you'd like it turned on for your account.
Coordinated Client Closing
When closing a client in Hidma, you now have the option to automatically archive the corresponding contacts in Xero, keeping both systems in sync. This means you don't need to separately close or archive contacts in Xero when you're done working with a client.
Archived Xero Client Visibility
Hidma clients that are linked to Xero contacts which have been archived externally in Xero now dynamically reflect that status right inside the Xero status chip on the client. You can see at a glance that a contact has been archived on the Xero side without having to switch over to Xero to check, so the two systems read consistently.
Enhanced Daily Digest
The Xero daily digest now automatically reflects status updates for invoices that have been modified or updated. When an invoice's status changes on either side - for example, moving from unauthorised to authorised, or being marked paid - the change is picked up so the digest gives you an accurate, up-to-date snapshot rather than a stale one. There's nothing to configure; the digest simply stays in step with the latest invoice statuses.
Enhanced Audit Trails
Hidma can include detailed audit history notes when syncing contacts or bills to Xero. This identifies exactly which Hidma user originated the update in Xero, providing a clear trail of who made changes and when.
TIP
Enhanced audit trails are currently a back-end toggle. Contact [email protected] to enable this for your account.
Sending a Bill to Xero
When the XERO integration is connected, the "Generate Bill" button on the bill creation page gives you three options for how to generate your invoice:
- Generate in Hidma only - Creates the bill in Hidma without sending it to Xero. Use this if you want to review the bill further before syncing, or if the bill doesn't need to go to Xero.
- Generate in Hidma & Xero - Creates the bill in Hidma and simultaneously sends it to Xero as an unauthorised invoice. The invoice appears in Xero pending approval.
- Generate in Hidma & Xero (Approved) - Creates the bill in Hidma and sends it to Xero as an authorized invoice. The invoice is immediately finalized in Xero, ready to be sent to the client.
How to Copy an Invoice to Xero
To send a bill from Hidma to Xero: create or open your bill, click the "Generate Bill" dropdown, and select either "Generate in Hidma & Xero" (as unauthorised, pending approval) or "Generate in Hidma & Xero (Approved)" (as authorized). The invoice will appear in your connected Xero account immediately.
Once a bill has been generated with Xero, you'll see:
- A "Xero Connected" indicator on the bill
- A "View Bill in Xero" button that opens the invoice directly in Xero
- Bill status buttons including Draft, Generated, Cancel All, and Authorize More
INFO
Hidma does not send draft bills to Xero — only unauthorised or authorized invoices. However, if you edit an invoice in Xero and convert it to a draft, that status change will sync back to Hidma.
WARNING
Once a bill has been authorized in XERO, no changes are allowed since the invoice has been authorized. If you need to make changes, you'll need to void the invoice in Xero first.
Using the Integration
Once connected and configured, the integration works in both directions:
When You Create a Bill in Hidma:
- Complete your normal billing process in Hidma
- Click "Generate Bill" and choose one of the Xero options
- The bill syncs to Xero as an invoice (draft or approved, depending on your choice)
- Use the "View Bill in Xero" button to verify the invoice in Xero
When You Record a Payment in Hidma:
- Record payment in Hidma as usual
- The payment automatically syncs to Xero
- Check Xero to see the payment recorded
When a Payment is Recorded in Xero:
- Record payment in Xero as usual
- The payment automatically updates the invoice status in Hidma
- Check Hidma to see the updated payment status
When a New Contact is Created in Xero: If a new contact is created directly in Xero, Hidma detects it and shows a "New Contact from Xero" dialog. You can choose to:
- Map the new contact to an existing Hidma client
- Create a new client in Hidma
- Choose "Do not Sync/Map Client" to skip it
Best Practices
Integration Best Practices
Use Service Accounts Connect using a team or service account email that won't change if individuals leave. This prevents integration breakage when team members depart.
Regular Verification Periodically check that invoices are syncing correctly by comparing a few recent bills between Hidma and Xero. Catch any sync issues early.
Consistent Tax Codes Set up your tax code mappings carefully from the start. Once invoices start syncing, changing tax mappings can create inconsistencies.
Test First If possible, test the integration with a few small invoices before relying on it for all your billing. Verify that amounts, tax, and descriptions sync as expected.
Monitor Sync Status Check the integration status page occasionally to ensure the connection remains active and no errors have occurred.
Document Your Mappings Keep a record of how you've mapped Hidma data to Xero accounts and tax codes. This helps when troubleshooting or training new team members.
Troubleshooting
Problem: Connection Fails
Possible causes:
- Incorrect Xero credentials
- Personal email instead of service account
- Insufficient Xero permissions
- Xero account suspended or expired
Solutions:
- Verify you're using admin-level Xero account
- Check that Xero subscription is active
- Ensure you're using a team/service email
- Try disconnecting and reconnecting
Problem: Invoices Not Syncing
Check:
- Is the integration still connected? (Check Settings > Integrations)
- Are tax codes properly mapped?
- Is the bill finalized in Hidma? (Drafts don't sync)
- Check Xero for any error messages
Solutions:
- Review and save your tax code mappings
- Finalize the bill in Hidma
- Check integration logs if available
- Disconnect and reconnect if persistent
Problem: Payments Not Updating
Verify:
- Payment recorded in Hidma or Xero against correct invoice
- Payment properly allocated to the invoice
- Integration is active and connected
Solutions:
- Re-allocate payment in either system
- Check that invoice numbers match between systems
- Wait a few minutes for sync (not always instant)
Problem: Duplicate Clients in Xero
Cause: Client may have been created in both Hidma and Xero before connection, or the same client name exists in more than one Xero tenant
Solution:
- Merge duplicate customer records in Xero
- Or, map the Hidma client to existing Xero customer in settings
- If the mapping is rejected with "Contact name already exists in Xero", resolve it directly from the dialog - see Guided Error Handling for Client Mapping
Disconnecting the Integration
If you need to disconnect Xero:
- Go to Settings > Integrations
- Find XERO Integration section
- Click "Disconnect" or "Revoke Access"
- Confirm the disconnection
Warning
Disconnecting will stop all automatic syncing. Existing invoices in Xero remain, but new bills won't sync and payment updates won't flow between systems.
Benefits of Integrations
Integrations like XERO can:
- Sync data between systems - Eliminate duplicate entry
- Reduce manual entry - Save time and reduce errors
- Keep everything up to date - Real-time or near-real-time synchronization
- Streamline workflows - Less switching between applications
- Improve accuracy - Fewer manual data entry errors
- Better reporting - Consolidated data across systems
Need Help?
Watch the XERO integration video tutorial above, or contact your Hidma administrator for account-specific integration questions.